Categoria: Recipes

Dive into culinary creativity in our Recipes category, where each dish tells a tale of flavor and tradition.

  • Fried Pastel with 2 ingredients

    Fried Pastel with 2 ingredients

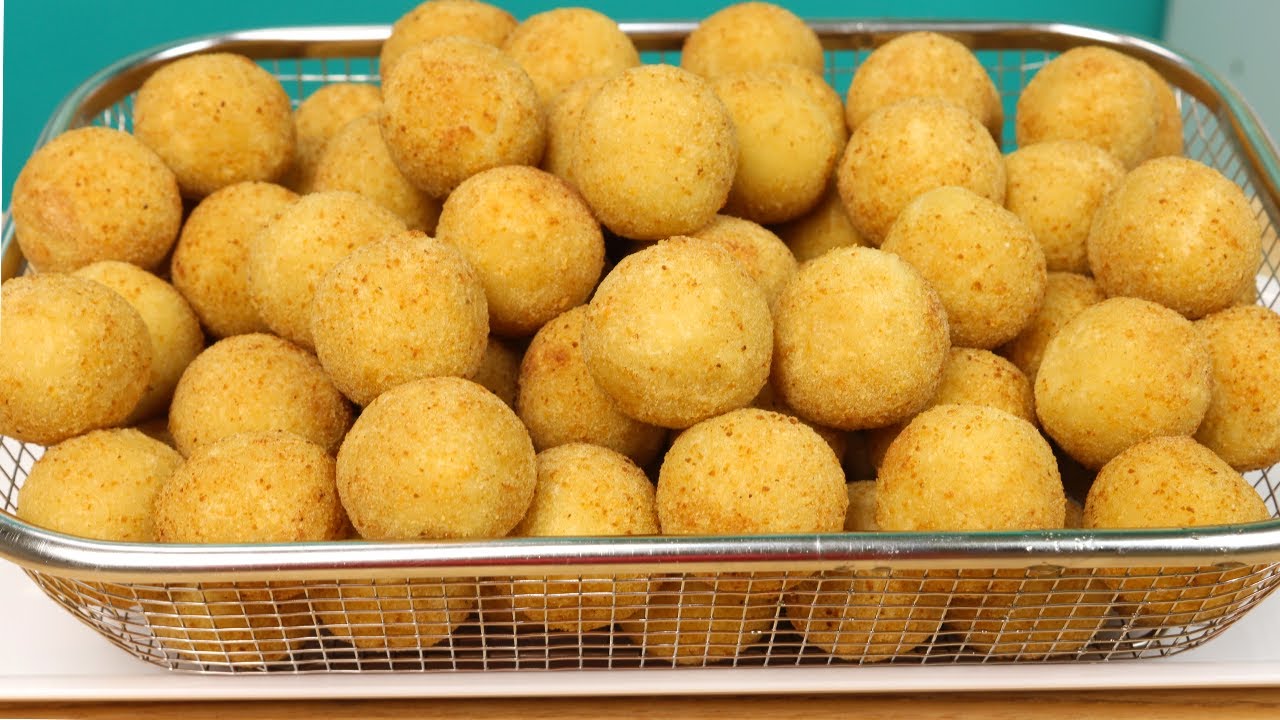
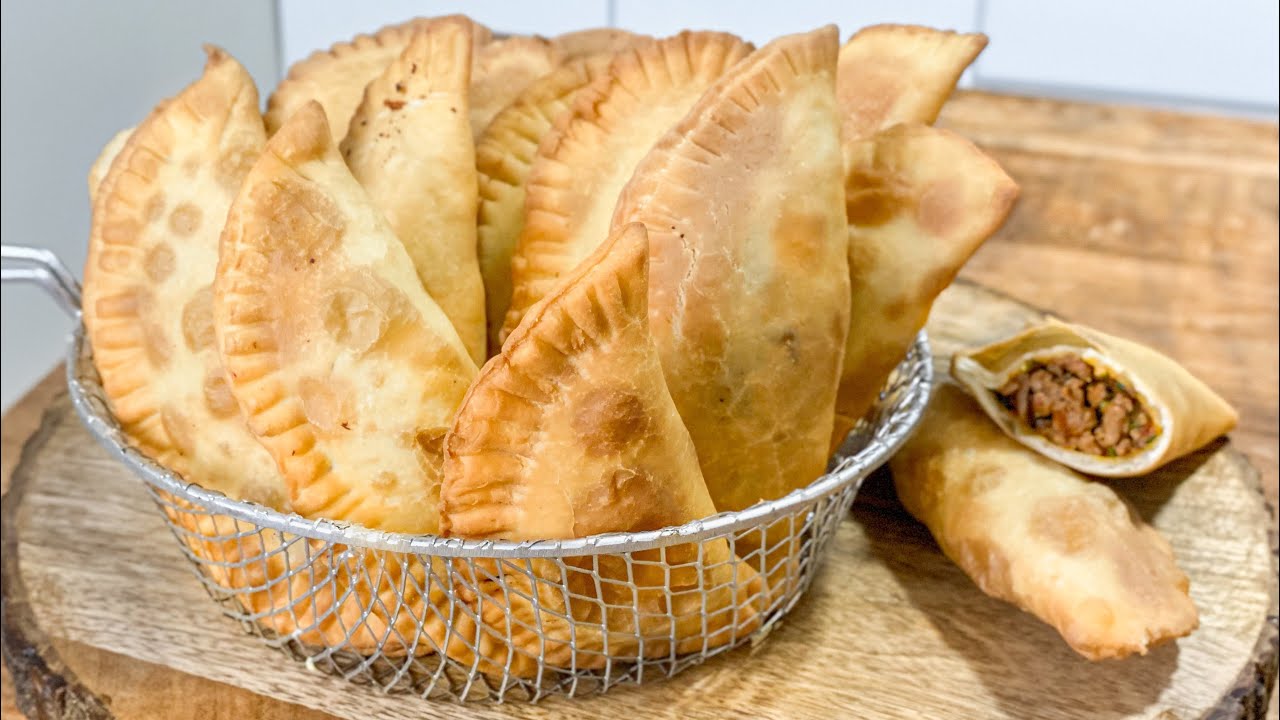
    Fried Pastel With 2 ingredients. Deep-fried pastel, a delightful treat enjoyed in many parts of the world, particularly in Brazil, where it goes simply by the name “pastel”. It’s a thin, crispy pastry filled with an array of ingredients such as ground beef, cheese, shredded chicken, shrimp, hearts of palm, among others. After being filled, the pastries are fried in hot oil until golden and crispy.

    Furthermore, fried pastel has gained prominence as part of Brazilian street food, being a quick and flavorful option for those seeking a practical and tasty meal.

    Fried Pastel with 2 ingredients

    Course: RecipesCuisine: BrazilianDifficulty: Easy
    Servings

    20

    servings
    Prep time

    1

    hour 
    Cooking time

    30

    minutes
    Calories

    250

    kcal

    Ingredients

    • Dough:
    • 2 boxes of cream cheese (200g each)

    • 1/2 cup of all-purpose flour

    • Salt to taste

    • Ground Beef Filling:
    • 3 tablespoons of olive oil

    • 1/4 onion, chopped

    • 3 cloves of garlic, minced

    • 350g ground beef

    • 1/2 teaspoon of paprika

    • Ground pepper to taste

    • 1 teaspoon of salt

    • 1/2 tomato, diced

    • 1/4 bell pepper, diced

    • Olives to taste

    • 3 tablespoons of tomato paste

    • Parsley to taste

    • Vegetable oil for frying

    Directions

    • Dough Preparation:
    • In a large bowl, mix the all-purpose flour and salt.
    • Add the cream cheese and mix well.
    • Gradually add the vegetable oil, kneading until a homogeneous and smooth dough forms.
    • Cover the dough with a damp cloth and let it rest for about 30 minutes.
    • Ground Beef Filling Preparation:
    • In a skillet, heat the olive oil over medium heat.
    • Sauté the chopped onion and minced garlic until golden and aromatic.
    • Add the ground beef and cook until fully browned.
    • Add the diced tomato and bell pepper, stirring well.
    • Season with salt, pepper, and parsley to taste.
    • Cook for a few more minutes until the vegetables are tender and the flavors are well incorporated.
    • Remove from heat and set aside to cool.
    • Assembling the Pastels:
    • Divide the dough into small portions and roll out each portion on a floured surface, forming thin discs.
    • Place a portion of the ground beef filling in the center of each dough disc.
    • Fold the dough in half and press the edges with a fork to seal the pastels.
    • Frying the Pastels:
    • In a deep pan, heat the vegetable oil over medium-high heat.
    • Once the oil is hot (around 180°C), add the pastels, a few at a time, being careful not to overcrowd the pan.
    • Fry the pastels until golden and crispy, turning them occasionally to ensure even cooking.
    • Remove the fried pastels with a slotted spoon and drain them on paper towels to remove excess oil.
    • Serving the Pastels:
    • Serve the hot fried pastels with your choice of dipping sauces, such as hot sauce, vinaigrette, or seasoned mayonnaise.

    Recipe Video

  • Brazilian Bahian Shrimp Moqueca with Coconut

    Brazilian Bahian Shrimp Moqueca with Coconut

    Brazilian Bahian Shrimp Moqueca with Coconut. Shrimp moqueca is a Brazilian dish I adore, full of vibrant flavors and tradition. With its roots in coastal culture, it’s an authentic expression of Brazil’s culinary diversity. I love the mix of succulent shrimp, creamy coconut milk, and fragrant palm oil, all combined with fresh spices.

    How did I learn this dish?

    I learned to make this delicious dish primarily through my passion for trying new cuisines. After tasting shrimp moqueca at a restaurant, I was determined to replicate this delicacy at home. In addition to experiencing the delight, I delved into the internet for information about the recipe. I found several reliable sources, from culinary blogs to instructional videos on YouTube.

    How to make Baiano Shrimp Moqueca with Coconut?

    Brazilian Bahian Shrimp Moqueca with Coconut

    Course: MainCuisine: BrazilianDifficulty: Easy
    Servings

    4

    servings
    Prep time

    5

    minutes
    Cooking time

    25

    minutes
    Calories

    185

    kcal
    Total time

    30

    minutes

    Ingredients

    • 400 g (14 ounces) of shrimp

    • Juice of 2 limes, divided

    • 2 cloves of garlic, chopped

    • 1 tablespoon of coconut oil

    • 1 medium red onion, diced

    • 1 medium red bell pepper, diced

    • 2 large cloves of garlic, finely chopped

    • 1 green bell pepper, seedless, finely chopped

    • ½ teaspoon of red pepper flakes

    • 1 tablespoon of paprika

    • 8 cherry tomatoes, diced

    • 400 ml (13.5 fl oz) of coconut milk

    • Fresh cilantro, for serving

    Directions

    • Start by placing the shrimp in a bowl and mixing in half of the lime juice and the chopped garlic. Season with salt and pepper and refrigerate for 30 minutes.
    • In a large saucepan, heat the coconut oil and fry the red onion and red bell pepper for 5 minutes until they are slightly soft. Add the garlic and green pepper and continue cooking for another minute.
    • Add the red pepper flakes and paprika, mix well, and cook for another 30 seconds. Add the shrimp and cook for 3-4 minutes until the shrimp are almost cooked.
    • Add the cherry tomatoes and cook for another 2-3 minutes, stirring constantly and mashing the tomatoes with a spoon as they cook.
    • Add the coconut milk, bring to a boil, and let it reduce and thicken for 1-2 minutes. Add the remaining lime juice and season to taste.
    • Serve with rice and garnish with fresh cilantro and extra lime slices.

    Recipe Video

    Notes

    • Each serving will be approximately 185 calories.
  • How to Make Delicious Real Banana Milk

    How to Make Delicious Real Banana Milk

    How to Make Delicious Real Banana Milk. Let’s learn together how to make this inexpensive delight of real banana milk, using whole bananas. A recipe beloved by many Koreans, without generalizing, of course.

    How to Make Delicious Real Banana Milk

    Ingredients:

    • 510g of bananas
    • 60g of sugar
    • 400ml of milk

    Instructions:

    1. First, let’s wash the glass bottles in boiling water to sterilize them. Be careful not to burn yourself.
    2. Next, peel the ripe bananas (the ones with black spots on the peels).
    3. Let’s start with the base first. We need 360g of sliced ​​bananas. Put them in a blender, then add 60g of sugar, and then 150ml of fresh milk. Blend all the ingredients until you get a homogeneous mixture.
    4. Now, take the bottles we mentioned earlier and pour about 190ml of the mixture into each bottle or into the container of your choice.
    5. Additionally, slice another 150g of bananas into thin slices and add 50g to each container with the mixture. Then, pour 250ml of milk into each container to complete.
    6. However, the milk should be consumed within 2 days after refrigeration.
    7. Before serving, shake it well to enjoy this delicious drink for breakfast or as a snack.
  • Easy Recipe for Fennel Tea with Lemon

    Easy Recipe for Fennel Tea with Lemon

    Easy Recipe for Fennel Tea with Lemon. The harmonious blend of fennel with lemon results in a delightfully refreshing tea that is not only a tasty option for any time of day but also offers medicinal properties that contribute to overall well-being.

    Benefits of Fennel:

    Fennel, also known as sweet anise, is renowned for its medicinal properties. It is rich in antioxidants, possesses anti-inflammatory properties, aids in digestion, relieves colic, and has calming effects.

    Easy Recipe for Fennel Tea with Lemon

    Ingredients for fennel tea:

    • 1 tablespoon fennel seeds
    • 1 lemon (preferably organic), sliced
    • 500 ml water

    Instructions for making fennel tea:

    1. In a saucepan, heat the water until it begins to boil.
    2. Add the fennel seeds to the boiling water.
    3. Reduce the heat and let the fennel seeds simmer for about 5 minutes.
    4. Remove the saucepan from the heat and let the tea steep for an additional 5 minutes.
    5. Strain the tea to remove the fennel seeds.
    6. Add the lemon slices to the strained tea.
    7. Allow the tea to cool slightly before serving.

    Uses of Fennel Tea:

    Fennel tea with lemon is known for various benefits, such as promoting healthy digestion, alleviating abdominal colic, reducing inflammation, and providing a relaxing effect.

    Side Effects:

    Generally, Fennel Tea is safe for most people when consumed in moderation. However, in rare cases, some individuals may experience allergic reactions. It is advisable to consult a healthcare professional if there are any concerns.

    Who Should Avoid:

    Pregnant women should avoid excessive consumption of fennel tea as it may impact pregnancy. Additionally, individuals with known allergies to plants in the Apiaceae family (such as celery, carrots, or coriander) should avoid consumption.

    Remember that moderation is key, and it is always advisable to seek medical guidance, especially if there are specific health conditions. Enjoy this comforting tea and benefit from the flavors and medicinal properties of fennel with lemon.

  • Recipe Shrimp Risotto: A Delight at Your Table!

    Recipe Shrimp Risotto: A Delight at Your Table!

    Welcome to the irresistible Shrimp Risotto recipe! This classic Italian dish combines the creaminess of rice with the richness of seafood. Get ready for a gastronomic experience that will delight your taste buds. With simple ingredients and easy steps, this risotto is perfect for a special meal or a cozy dinner at home.

    Recipe Shrimp Risotto: A Delight at Your Table!

    Ingredients:

    • 300g of cleaned shrimp
    • 1 cup of Arborio rice
    • 1 chopped onion
    • 2 cloves of minced garlic
    • 1/2 cup of dry white wine
    • 1.5 liters of vegetable broth
    • 2 tablespoons of butter
    • 2 tablespoons of olive oil
    • Salt and pepper to taste
    • Grated Parmesan cheese to finish

    Instructions:

    1. Prepare the Ingredients:
      • Peel and clean the shrimp. Set aside.
    2. Sauté the Base:
      • In a pan, sauté the onion and garlic in olive oil until golden brown.
    3. Add the Rice:
      • Add the rice and stir until lightly golden.
    4. Deglaze with Wine:
      • Pour in the white wine, stirring until absorbed by the rice.
    5. Cook Gradually:
      • Gradually add vegetable broth, stirring constantly until the rice absorbs the liquid.
    6. Incorporate the Shrimp:
      • Add the shrimp and cook until they turn pink and cooked through.
    7. Finish with Creaminess:
      • Mix in the butter, season with salt, pepper, and finish with Parmesan cheese.
    8. Serve Immediately:
      • Serve your Shrimp Risotto hot, savoring the rich flavor of this incredible dish!

    Thank you for exploring the Shrimp Risotto recipe! We hope you enjoyed it. Please leave a comment about your experience and share it with friends and family so everyone can savor this delicious dish together. Until the next recipe! 🍤🍚

    If you have any doubts about the above recipe, watch the video below for an alternative preparation. I hope you enjoy it.

  • Cheese Balls Recipe: Dough Elegance and Unmatched Flavor!

    Cheese Balls Recipe: Dough Elegance and Unmatched Flavor!

    Cheese Balls Recipe: Dough Elegance and Unmatched Flavor! We’ve perfected the cheese balls recipe to bring you an even more amazing culinary experience. This version features a light and delicious dough, along with essential tips to ensure smooth frying. Get ready to create irresistible cheese balls!

    Additionally, we present to you this amazing and budget-friendly cheese balls recipe with a delicate and irresistibly tasty dough. Don’t miss the step-by-step video guide for crafting these delights known as cheese balls. Brace yourself for a unique and deliciously accessible culinary experience!

    Cheese Balls Recipe

    INGREDIENTS:

    Dough:

    • 2 tablespoons of margarine
    • 2 chicken bouillon cubes
    • 2 cups of milk
    • 4 cups of water
    • 1/2 tablespoon of salt
    • 6 cups of unleavened wheat flour
    • 50 grams of grated Parmesan cheese

    Filling:

    • 500 grams of mozzarella cheese, cut into pieces

    FOR COATING:

    • 1 egg
    • 50 ml of milk
    • 250 grams of breadcrumbs
    • Cooking oil for frying

    INSTRUCTIONS:

    1. In a saucepan, melt the margarine and dissolve the chicken bouillon cubes in the milk and water. Add salt and heat until it boils.
    2. Gradually add the wheat flour, stirring constantly to prevent lumps, until you have a smooth dough that comes off the pan.
    3. Remove the dough from heat, add the grated Parmesan cheese, and mix well until the cheese is incorporated.
    4. Let the dough cool a bit, then shape small portions in your palm, filling each one with pieces of mozzarella cheese.
    5. Shape the balls and set aside.
    6. In a bowl, beat the egg and mix it with milk for coating the balls.
    7. Dip each ball in the egg and milk mixture, then in breadcrumbs, ensuring an even coating.
    8. Heat the oil in a pan and fry the balls until golden. Remove and place on paper towels to absorb excess oil.
    9. Serve the cheese balls while still hot and relish in this burst of flavor!

    With this refined recipe, your cheese balls will be an absolute hit on any occasion. Enjoy!

  • Millefeuille Dessert With Strawberries

    Millefeuille Dessert With Strawberries

    Indulge in the exquisite layers of our Millefeuille Dessert with Strawberries. This classic French pastry, also known as Napoleon, is a symphony of delicate puff pastry, luscious pastry cream, and fresh strawberries.

    The harmonious blend of textures and flavors creates a dessert that’s not only visually stunning but also a true delight for your taste buds. Join us as we guide you through the meticulous steps to create this decadent masterpiece, perfect for elevating any special occasion or savoring as a sweet treat.

    Millefeuille Dessert With Strawberries

    Ingredients:

    Puff Pastry:

    • 1 sheet of store-bought puff pastry (thawed, if frozen)
    • Confectioners’ sugar (for dusting)

    Pastry Cream:

    • 2 cups whole milk
    • 4 large egg yolks
    • 1/2 cup granulated sugar
    • 1/4 cup cornstarch
    • 1 teaspoon vanilla extract

    For Assembly:

    • 1 pint fresh strawberries, hulled and sliced
    • 1/4 cup apricot jam (for glaze)

    Instructions:

    1. Preparing the Puff Pastry:

    • Rolling and Cutting: On a lightly floured surface, roll out the puff pastry sheet into a rectangle. Using a sharp knife, cut the pastry into three equal-sized rectangles.
    • Baking: Place the pastry rectangles on a parchment-lined baking sheet. Prick the surface with a fork to prevent excessive puffing. Bake in a preheated oven at 400°F (200°C) for 15-20 minutes or until golden brown and puffed. Let it cool.
    • Dusting with Sugar: Dust the cooled puff pastry rectangles with confectioners’ sugar for a touch of sweetness.

    2. Making the Pastry Cream:

    • Heating the Milk: In a saucepan, heat the whole milk over medium heat until it reaches a simmer. Remove from heat.
    • Whisking Yolks and Sugar: In a mixing bowl, whisk together egg yolks and granulated sugar until pale and slightly thickened.
    • Incorporating Cornstarch: Add cornstarch to the egg mixture and whisk until smooth.
    • Tempering the Eggs: Slowly pour the heated milk into the egg mixture, whisking continuously to temper the eggs.
    • Cooking the Custard: Transfer the mixture back to the saucepan and cook over medium heat, stirring constantly until it thickens into a custard-like consistency. Remove from heat and stir in vanilla extract. Let it cool.

    3. Assembling the Millefeuille:

    Layering Puff Pastry and Cream: Place one puff pastry rectangle on a serving platter. Spread a generous layer of pastry cream evenly over it. Repeat this process, stacking the remaining puff pastry rectangles and pastry cream.

    Arranging Strawberries: Top the final layer of pastry cream with sliced strawberries, arranging them in a visually appealing pattern.

    Glazing with Apricot Jam: In a small saucepan, heat apricot jam until it becomes a smooth glaze. Gently brush the strawberries with the apricot glaze for a glossy finish.

    Serving

    • Chilling: Allow the assembled Millefeuille to chill in the refrigerator for at least 1-2 hours, allowing the layers to set.
    • Slicing: When ready to serve, use a sharp knife to slice the Millefeuille into individual portions.
    • Garnishing: Optionally, garnish with additional sliced strawberries or a dusting of confectioners’ sugar for an extra touch of elegance.

    Prepare to be captivated by the sumptuous layers of our Millefeuille Dessert with Strawberries. This intricate masterpiece is not just a treat for the eyes but a symphony of textures and flavors that will transport your taste buds to the heart of Parisian pastry excellence. Perfect for special occasions or when you crave a touch of sophistication, this delightful dessert is sure to become a cherished favorite in your repertoire.

  • Spicy Beef Stew with Wild Mushrooms

    Spicy Beef Stew with Wild Mushrooms

    Step into a world of hearty indulgence with our Spicy Beef Stew with Wild Mushrooms. This recipe is a culinary voyage that marries succulent beef with a medley of wild mushrooms, creating a symphony of flavors that will warm your soul.

    As the rich aroma permeates your kitchen, anticipate the satisfaction of each tender beef cube infused with a harmonious blend of spices. Join us on this culinary adventure, and let’s dive into the detailed steps that make this Spicy Beef Stew with Wild Mushrooms a true masterpiece for your dining pleasure.

    Spicy Beef Stew With Wild Mushrooms

    Ingredients:

    • 2 pounds (about 907g) beef stew meat, cubed
    • 2 tablespoons vegetable oil
    • 1 large onion, finely chopped
    • 3 cloves garlic, minced
    • 1 teaspoon cumin powder
    • 1 teaspoon coriander powder
    • 1 teaspoon smoked paprika
    • 1 teaspoon chili powder (adjust for desired spice level)
    • Salt and black pepper, to taste
    • 1/2 cup tomato paste
    • 1 cup red wine
    • 4 cups beef broth
    • 1 bay leaf
    • 1 pound (about 454g) mixed wild mushrooms (such as shiitake, oyster, and cremini), cleaned and sliced
    • 3 carrots, peeled and sliced
    • 3 celery stalks, sliced
    • 1 tablespoon soy sauce
    • Fresh parsley, chopped (for garnish)

    Instructions:

    Preparing the Beef:

    • Seasoning: Pat the beef cubes dry with paper towels and season them generously with salt and black pepper.
    • Searing: In a large, heavy-bottomed pot, heat vegetable oil over medium-high heat. Sear the beef cubes in batches until browned on all sides. Set aside.

    Sautéing Aromatics:

    • Onion and Garlic: In the same pot, add finely chopped onion and minced garlic. Sauté until softened and aromatic.

    Building Spice Layers:

    • Spice Mix: Sprinkle cumin powder, coriander powder, smoked paprika, and chili powder over the sautéed onions and garlic. Stir well to coat the aromatics in the spices.

    Tomato Base:

    • Incorporating Tomato Paste: Add tomato paste to the pot, stirring to combine with the spices. Allow it to cook for a few minutes until the mixture develops a deep, rich color.

    Deglazing with Red Wine:

    • Pouring Red Wine: Pour in the red wine, using a spoon to scrape up any flavorful bits stuck to the bottom of the pot. Let it simmer until the wine is reduced by half.

    Creating the Stew Base:

    • Adding Broth and Bay Leaf: Return the seared beef to the pot. Pour in the beef broth and add the bay leaf. Bring the mixture to a gentle boil, then reduce the heat to low and cover. Allow it to simmer for about 1.5 to 2 hours or until the beef is tender.

    Infusing Mushroom and Vegetable Flavors:

    • Incorporating Mushrooms, Carrots, and Celery: Stir in the sliced wild mushrooms, carrots, and celery. Let the stew simmer for an additional 30 minutes, allowing the vegetables to absorb the rich flavors.

    Final Touches:

    • Enhancing with Soy Sauce: Just before serving, stir in soy sauce to enhance the umami flavors of the stew.
    • Adjusting Seasoning: Taste the stew and adjust the seasoning with salt and pepper as needed.

    Serving:

    • Garnishing: Ladle the Spicy Beef Stew with Wild Mushrooms into bowls, garnishing with chopped fresh parsley.
    • Pairing: Serve the stew over cooked rice, mashed potatoes, or with a hearty bread to soak up the savory broth.

    Get ready to savor a bowlful of warmth and spice with our Spicy Beef Stew with Wild Mushrooms. This robust dish is a testament to the art of slow cooking, transforming simple ingredients into a symphony of flavors. Enjoy the comforting aromas that fill your kitchen as this stew simmers to perfection. Whether shared with loved ones or savored solo, this recipe is sure to become a cherished favorite in your culinary repertoire.

  • Duck Breast With Cranberry Sauce

    Duck Breast With Cranberry Sauce

    Elevate your dining experience with a culinary masterpiece – Duck Breast with Cranberry Sauce. This sophisticated dish harmonizes the rich, tender essence of duck with the vibrant allure of a homemade cranberry sauce.

    From the perfectly seared skin to the luscious, sweet-tart cranberry accompaniment, every element promises a symphony of flavors. Join us on a journey through the detailed preparation of this delectable recipe that transforms a simple meal into a gourmet delight.

    Whether for a special occasion or an ordinary day made extraordinary, this dish captures the essence of culinary finesse.

    Duck Breast With Cranberry Sauce

    Ingredients:

    • 2 duck breasts
    • Salt and black pepper, to taste
    • 1 tablespoon olive oil
    • 1 cup fresh or frozen cranberries
    • 1/2 cup orange juice
    • 1/4 cup honey
    • 2 tablespoons balsamic vinegar
    • 1 teaspoon grated orange zest
    • 1 tablespoon unsalted butter

    Instructions:

    Preparing the Duck Breast:

    1. Score the Skin: Using a sharp knife, score the duck breast skin in a crosshatch pattern. Ensure not to cut into the meat.
    2. Seasoning: Season both sides of the duck breasts generously with salt and black pepper. Allow them to sit at room temperature for about 20 minutes.
    3. Preheat Oven: Preheat your oven to 375°F (190°C).
    4. Searing the Duck: In an oven-safe skillet, heat olive oil over medium-high heat. Place the duck breasts skin side down and sear for about 5 minutes or until the skin is golden and crispy.
    5. Oven Roasting: Transfer the skillet to the preheated oven and roast for 12-15 minutes or until the internal temperature reaches around 130°F (54°C) for medium-rare. Adjust the time for your preferred doneness.
    6. Resting: Once done, remove the duck from the oven and let it rest on a cutting board for about 5-10 minutes before slicing.

    Preparing Cranberry Sauce:

    1. Sauté Cranberries: In a saucepan, combine cranberries, orange juice, honey, balsamic vinegar, and orange zest. Cook over medium heat until cranberries burst and the sauce thickens.
    2. Finishing Touch: Stir in the unsalted butter to add richness and smoothness to the sauce. Adjust the sweetness or acidity according to your taste.

    Serving:

    1. Slice and Plate: Slice the duck breasts diagonally and arrange them on plates.
    2. Drizzle Cranberry Sauce: Spoon the cranberry sauce over the sliced duck breasts, allowing it to blend with the savory flavors.
    3. Garnish: Optionally, garnish with fresh herbs like thyme or rosemary for an extra burst of aroma.
    4. Serve Warm: Serve immediately, and enjoy the succulent duck paired with the vibrant cranberry sauce.

    This Duck Breast with Cranberry Sauce is a perfect combination of rich, tender meat and a sweet-tart sauce, creating a delightful harmony of flavors that will elevate any dining experience.

  • Classic Canjica Preparation

    Classic Canjica Preparation

    Classic Canjica Preparation. As the cold nights approach, how about the comfort of a warm bowl of canjica? Originally, this customary indulgence is a true culinary embrace, a variety of flavors that transport us to the past.

    Therefore, stick with this inexpensive and comforting recipe for canjica with cinnamon. It’s time to warm both your heart and your palate. Additionally, set aside sadness and embark on an engaging culinary journey with an irresistible texture.

    Classic Canjica Preparation

    Ingredients:

    • 1 cup of canjica
    • 1 liter of milk
    • 1 can of condensed milk
    • 1 cup of sugar
    • 1 cinnamon stick
    • A pinch of salt
    • Ground cinnamon for dusting (optional)

    Instructions:

    1. Rinse the canjica and soak it in water for at least 4 hours.
    2. Cook the canjica in water until it becomes soft, drain, and set aside.
    3. In a pot, combine the milk, condensed milk, sugar, cinnamon stick, and a pinch of salt.
    4. Add the cooked canjica to the mixture in the pot and cook over low heat, stirring occasionally, until it reaches a creamy consistency.
    5. Remove the cinnamon stick and serve hot. If desired, sprinkle with ground cinnamon.

    Health Benefits:

    In addition to satisfying sweet cravings, canjica is an excellent source of energy, fiber, and essential nutrients. The corn used in the recipe is rich in antioxidants, promoting cellular health. Milk contributes to bone health due to its calcium content, while cinnamon, besides adding flavor, has anti-inflammatory properties.

    Therefore, thank you for visiting the website receitasbaratas.blog and joining this culinary journey. I hope this canjica recipe with cinnamon warms not only your stomach but also your heart with fond memories. Save the site to your favorites for more economical delights and share this recipe with friends and family. May each spoonful be a toast to the sweet moments of life!